Free Receipt Generator
Ready to save time and effort on customer payments? Streamline hours down to just a few clicks—customize our printable receipt template by filling in your business name, logo, client details, job information, transaction date, and more. Download a professional-looking service receipt as a printable PDF, then easily send it to clients after the job’s done.
Download your free receipt template
Save Your Custom Receipt Template
Try Jobber for Free Today!
How to write a receipt
You can create a receipt using tools like Microsoft Word, Google Docs, Excel, or Google Sheets. Or, for a faster, more convenient process, use the above customizable receipt generator built for service-based work.
Follow these steps to create a clear, professional receipt with our blank receipt template:
- Enter your business name, address, phone number, email, and website.
- Upload your company logo by clicking “Upload Logo”.
- Add your customer’s name, address, and contact information.
- Fill in the receipt number, date of issue, and payment method.
- List the services and/or products provided, including the service name, description, quantity, rate, and total. You can add multiple lines by clickling “+ Add Line”
- Enter any applicable discounts and adjust your tax percentage.
- Add any final notes, thank-you messages, or payment terms in the Notes section.
- Preview the final receipt and click download, print, or email.
Why should I use a receipt template?
Here’s how your service business will benefit from using a payment receipt template:
- Saves time – Quickly generate professional receipts without starting from scratch.
- Looks professional – Builds trust with customers through clean, branded documentation.
- Proof of payment – Provides clear records for both you and your clients.
- Keeps you organized – Helps track jobs, payments, and outstanding balances.
- Supports taxes and accounting – Makes year-end bookkeeping and tax filing easier.
- Easy to use – Fill it out online from your phone, tablet, or computer.
Looking for an industry-specific receipt?
- Cleaning Receipt Template
- Contractor Receipt Template
- Handyman Receipt Template
- HVAC Receipt Template
- Junk Removal Receipt Template
- Landscaping Receipt Template
- Lawn Care Receipt Template
- Painting Receipt Template
- Pest Control Receipt Template
- Plumbing Receipt Template
- Pressure Washing Receipt Template
- Roofing Receipt Template
- Snow Removal Receipt Template
- Window Cleaning Receipt Template
FAQ
-
A receipt is a written record of a customer’s payment for products or services. It shows how much they paid and when, which is useful in case there’s a future dispute or other problem with the services you provided. Both you and your customer get a copy of the receipt for your records.
Our free service receipt template makes it easy to customize and send out professional-looking receipts for services you’ve completed. It’s the perfect tool for wrapping up any customer transaction, whether you’re just starting a service business or you’ve been in business for years. -
Your service receipt should include this information:
• Your business name, address, and contact details
• The customer’s name and contact information
• The date when you provided service or completed the transaction
• Receipt number that matches your estimate, job, or invoice number
• Products/services provided, including item description, quantity, and cost
• Total payment amount, including subtotal, discounts, tips, and taxes
• Payment terms and conditions related to the transaction
• Any notes about the transaction (e.g., if this amount is a partial payment)
• A brief thank-you note showing you appreciate the client’s business
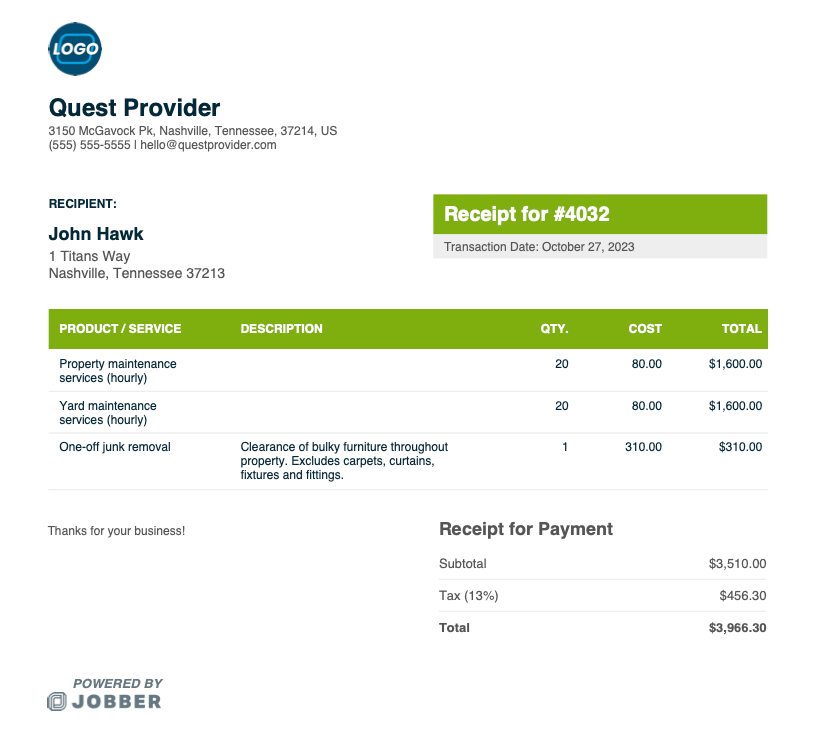
Your receipt should also include the word “receipt” in big letters. Receipts and invoices look very similar, so it’s important for this payment record to indicate that the customer has already paid in full for your services.
If you use a basic receipt generator like this one, your receipt will automatically include all the details you need. Check out the receipt sample below to see how a finished receipt should look: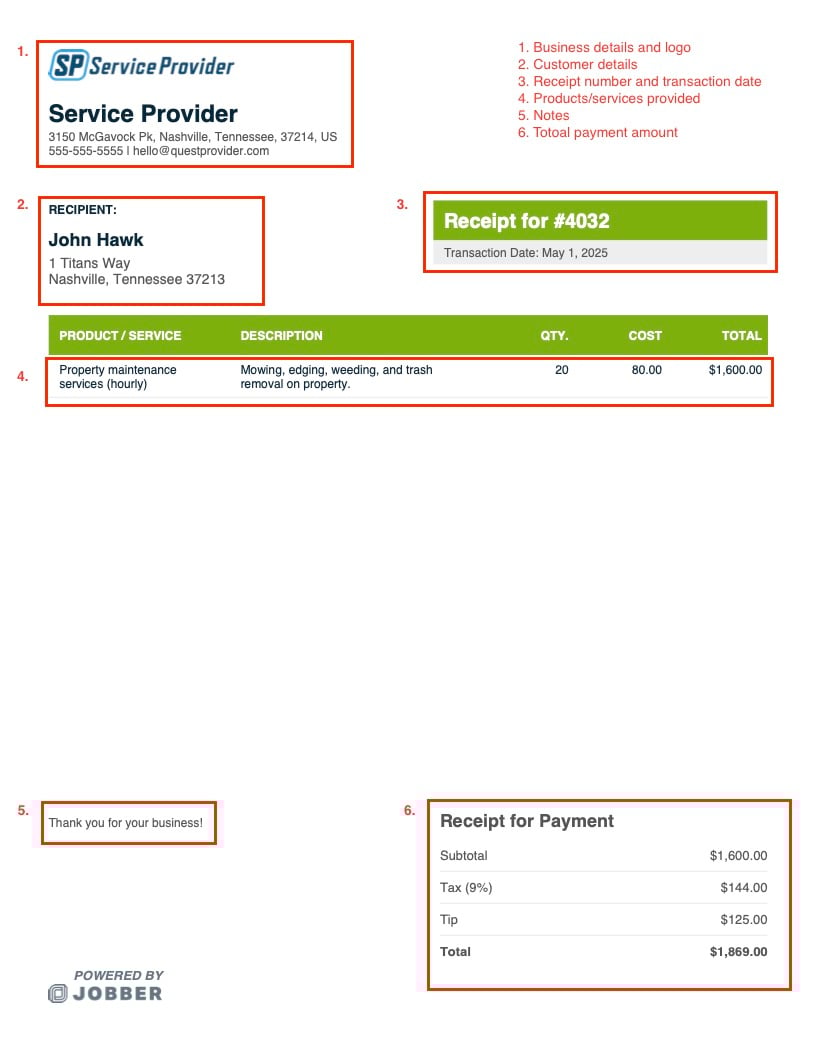
-
A basic receipt template helps you create a detailed receipt for your customer after you’ve provided a product or service. You can find these receipt templates as editable PDFs, Google Docs, Microsoft Word documents, and Excel spreadsheets.
Here’s what our simple receipt template can help you do:
• Create and send accurate receipts to customers with just a few clicks
• Save time and money making your own receipts
• Customize receipts with your business and customer details
• Make a good impression with digital receipts instead of handwritten documents
• Build a reputation as a credible and professional business
• Make receipts in the office or on the go using your phone
• Avoid errors by automatically adding up service prices and taxes
• Prevent customer disputes by sending digital proof of payment
• File your receipt by downloading it as a printable PDF
• Keep accurate financial records for tax season
With a blank receipt template, you can enter all the information your customer needs to see. The generator automatically calculates how much you charged for services and tallies it all up for you, including taxes and tips. It takes just a few minutes to enter the project details and send the receipt to your customer—much less time than using pen and paper.
Creating and sending receipts is even easier when you use home service software like Jobber. Send an invoice, get paid faster through Jobber Payments, and automatically generate a receipt for the customer—no extra effort required. You can also manage all of your payment details in the same place you manage your work. -
You can use this free receipt generator to create receipts for USD and CAD transactions. If you need more currencies, try Jobber for free.
-
Yes! You can upload a PNG, JPG, or GIF logo file up to 1MB. Just click “Add Logo” and select your company’s logo file from your computer.
-
TheThe best time to send a receipt to a customer is right after they send payment. That way you’re finalizing the transaction as soon as possible, as well as reducing the risk of forgetting to send the receipt. The sooner you send a detailed, accurate receipt, the more likely your customer will see you as a professional home service business.
There are a couple of ways to send receipts to clients. You can save your receipt as a PDF and email it to the client, print the receipt and physically give it to the client, or print and mail it to their address. Just ask your customers which option is most convenient for them.
-
A receipt is written proof that your customer paid their invoice. Here’s how that process looks:
You send an invoice (also known as a bill) to your customer after giving them a product or service. When you’re writing the invoice, you include a detailed list of what you provided and how much it cost. The customer then receives this document and knows what they need to pay and by what date.
You send a receipt to the customer after they pay their invoice. The receipt includes the same information as the invoice, but the document is marked as “paid.” That way, both you and the customer have a record showing that you provided services, and the customer paid you for that service. This completes your transaction with the customer.
If you’d like to make an invoice instead of a receipt, use our free invoice template. -
Generally you should keep client receipts for 3–6 years after the tax year when the transaction took place. The exact length of time varies depending on where you live:
• U.S.: Hang onto receipts until three years from the date you filed your taxes for that year.
• Canada: Keep your receipts for six years after the end of the relevant tax year.
• UK: Store receipts for 5 years after the relevant tax year’s submission deadline.
• Australia: Keep all receipts for 5 years from the date you lodged your tax return.
When you no longer need to keep receipts, shred them to ensure these records of customer data are securely destroyed. -
Always save and file your receipts when transactions are complete. This will make it easier to file your taxes at the end of the financial year. Try these tips for organizing your receipts:
• Get a business bank account for processing all incoming and outgoing payments. This will keep all your transaction details visible in one place.
• Save original and digital copies of your receipts on site at your place of business. Make sure your receipt filing system meets your country’s storage requirements.
• Come up with a filing system that works for you. One way is to organize receipts by year, then sort them by client or project.
• Use invoicing software like Jobber to automatically convert estimates into invoices, then into receipts, and keep them all organized. That way you don’t have to do any extra legwork or paperwork after getting paid.